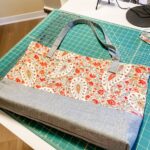
Ingredients
- Fabric – Quilter’s cotton or lightweight cotton canvas, 42 to 45 inches
- ¾ yard focus fabric for bag body
- ½ yard contrast fabric for handles and bottom
- Rotary Cutter
- Cutting Mat
- Ruler
- Tailor’s chalk or fabric marking pen
- Iron and ironing board
- Pins
- Sewing machine (walking foot suggested if using cotton canvas)
- Thread
- Corrugated plastic sheet (optional but gives the bag a sturdy base and nice shape)
Instructions
All seams are half inch unless otherwise indicated.
Step One: Cutting the Fabric and Optional Plastic Bottom
Trim selvages off fabrics. From contrast fabric, cut two 4-inch by WOF (width of fabric) strips for handles, and trim to 30 inches. Cut one 7-inch by WOF strip for the bag bottom.
If necessary, square up and trim the focus fabric. It should be approximately 27 inches long.
If using, cut the corrugated plastic into a 3-inch by 19-inch strip.
Step Two: Making the Handles
With the wrong sides of fabric facing, fold each 4-inch strip in half lengthwise. Iron with steam, creating a crease down the center of each strip.
Open the pressed strips with the right side of the fabric face down on the ironing board. Fold one side to the center crease of each strip and press. Repeat with the other side of each strip, so the fabric meets at the center crease.
Fold along original center crease and press, creating two handles, 1-inch in width.
Top stitch along the long, open side of each handle, about 1/8 of an inch from the edge. Set handles aside.
Step Three: Sewing the Bag Body
With right sides of fabric together, pin the long side of the 7-inch contrast strip to the body fabric. Sew, using a half-inch seam. (Note: if you are using directional fabrics, remember that the 7-inch strip will be on the bottom of the bag.)
Press the seam open. If either fabric strip is longer than the other, trim off excess fabric so the edges are even.
With right sides together, fold the stitched fabric in half lengthwise into a rectangle,
approximately 22 by 33 inches and press. Pin the edges. Starting with the bottom contrast fabric, sew around the three open edges, leaving an opening of 5-6 inches at the top.
Reach into the opening and turn the bag so the right sides are facing out. Use your fingers or a stylus to push out the corners and edges.
Fold the opening under half an inch and press. Stitch or zig-zag the edges of the opening to keep the fabric from raveling, but do NOT sew the opening closed.
Push the top half of the fabric through the opening, toward the bottom half, creating a lining for your bag. Nest the corners together at the bottom, align the upper and lower seams as closely as possible, and make sure that the top edge of the bag is even.
The body of your bag is done! It should measure about 16 x 20. (Don’t worry if it’s not exact)
Stitching the Boxed Bottom
Creating a boxed bottom gives the bag a finished look and is easier than you might think!
Turn the bag inside out with the bottom facing up, the lower seam centered, and the two bottom corners aligned evenly. (Refer to photos in post.)
Measure up one inch from the tip of each corner up the center seam and make a mark. Place the ruler across that point in the center, and draw a stitching line, two inches from one side to the other. Pin fabric. Repeat at the other corner. (If not using corrugated plastic bottom in bag, hand stitch to close the opening.)
Stitch across the corner along marked line, backstitching at start and finish. Turn bag right side out and push out the corners to create a boxed bottom.
Step Four: Sewing the Cuff and Attaching Handles
Fold the top down two inches and iron with steam, creating a cuff. Unfold cuff and make a small mark on the upper part, 5 inches from outer edge. Repeat on each edge and side, making 4 marks total.
Center the end of a handle on the first mark, butting up to the crease. Pin handle to cuff. Repeat on the other side, making sure handle isn’t twisted. Repeat on opposite side with remaining handle. (The handle loops should extend above the top of the bag.)
Secure the handle ends by stitching a quarter inch in from the crease, and once again a quarter inch from the top of the bag. Only stitch across the handles, not onto the cuff.
Fold the cuff down, so the handle loops are resting on the body of the bag. Fold the handles back up over the cuff and pin into place.
Step Five: Top Stitching and Finishing
Beginning at the seamed side of the bag, top stitch the cuff and handles to the body, ¼ inch from the bottom edge of the cuff and again ¼ inch from the top of the bag.
If using, slide the strip of corrugated plastic into the opening at the bottom of the bag.
Center the plastic so that it sits evenly in bag bottom. If desired, hand stitch the opening closed. (If you plan to wash tote, you may wish to leave opening so you can remove plastic before washing.)
